A Plus Garage Doors knows this situation well: a broken garage door spring is not a minor inconvenience. It can leave your car trapped, your home unsecured, and in worst-case scenarios, cause serious injury if handled incorrectly. Torsion springs operate under extreme tension, enough force, according to industry safety data, to cause severe lacerations or fractures if they snap during installation.
That said, replacing a garage door spring is a task that experienced DIYers can handle with the right knowledge, proper tools, and a healthy respect for the risks involved. This guide walks you through the full process, from identifying your spring type to setting final tension, so you can approach the job with confidence rather than guesswork.
Understanding Garage Door Springs Before You Touch Anything
Before you pick up a winding bar, you need to understand what you’re dealing with.
There are two main types of garage door spring systems:
- Torsion springs: Mounted horizontally above the door opening on a metal shaft. These are the most common type in modern residential garages. They work by storing rotational energy as the door closes.
- Extension springs: Mounted along the horizontal tracks on either side of the door. Older and simpler in design, these stretch and contract as the door moves.
Most safety professionals and the International Door Association recommend torsion spring systems for their superior balance and reduced injury risk compared to extension springs. However, both types require careful handling.
If you’re unsure which type your garage uses, A Plus Garage Doors offers detailed resources to help homeowners identify their spring system and understand what replacement involves before committing to the work.
Tools and Materials You’ll Need
Skipping the right tools is how people get hurt. Do not substitute items here.
Essential tools:
- Two solid steel winding bars (sized for your spring’s winding cone, never use screwdrivers or rebar)
- Adjustable wrench and socket set
- Locking pliers (C-clamps work well too)
- Ladder, ideally a stepladder for stability
- Safety glasses and work gloves
- Tape measure and marker
Materials:
- Replacement torsion or extension spring (matched to your door’s weight and height, see below)
- Replacement cables if they show wear
- Garage door lubricant spray
Matching the spring to the door is critical. Springs are rated by wire size, inside diameter, and length. Use your existing spring’s specs or measure the old spring directly. Getting this wrong means the door won’t balance properly, which puts extra strain on the opener motor and shortens the lifespan of the entire system.
Step 1: Disconnect Power and Secure the Door
Start by unplugging the garage door opener. Then manually lock the door in the closed position using locking pliers clamped to the track just below the bottom roller on each side. This prevents the door from moving while you work.
Never work on springs with the door in the open position. A door held up only by a broken or partially unwound spring can drop without warning.
Step 2: Release Tension from the Old Spring
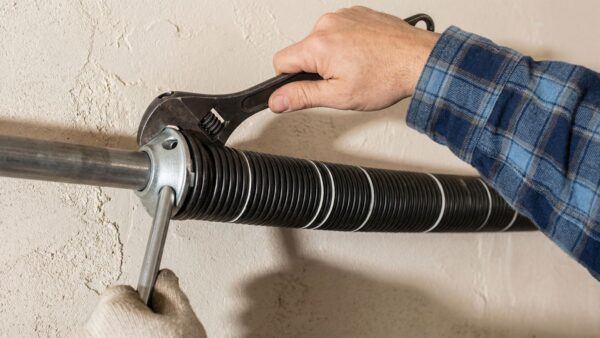
For torsion springs, insert a winding bar into one of the holes on the winding cone. Keep your body to the side, never directly in front of the spring. Use controlled, quarter-turn movements to unwind the spring completely.
A standard residential torsion spring typically requires 30 to 36 quarter-turns to fully unwind. Count every turn and keep both bars engaged when switching between holes. Rushing this step is where most injuries happen.
For extension springs, the process is different. Once the door is clamped and the spring is slack, you can unhook the spring from the track bracket and safety cable. Always keep the safety cable in place when removing extension springs. It’s what prevents the spring from becoming a projectile if something goes wrong.
Step 3: Remove the Old Spring and Hardware
Once tension is fully released, loosen the set screws on the spring cable drum using a socket wrench. Slide the drum off the shaft, then remove the old spring from the center bracket. Note the spring’s winding direction before removing it. Right-wound springs go on the left side, left-wound springs go on the right. This is a common source of confusion and a costly mistake to correct after the fact.
If the lift cables show fraying, kinks, or rust, replace them now. It costs very little compared to the labor of coming back to do it later.
Step 4: Install the New Garage Door Spring
Slide the new spring onto the torsion bar, positioning it so the stationary cone faces the center bracket. Secure the stationary cone with the provided hardware, then reattach the cable drum and thread the lift cable back through it.
Make sure the cable sits cleanly in the drum groove without overlapping. Overlapping cables cause the door to bind and wear unevenly, which can damage the drum and cable anchor within months.
Tighten the set screws firmly but not with excessive force. Overtightening can strip the threads on the shaft.
Step 5: Wind the New Spring to the Correct Tension
This is the most technically demanding part of the job. Wind the spring using your winding bars in quarter-turn increments.
The standard starting point is one turn (four quarter-turns) per foot of door height. For a 7-foot door, that’s 28 quarter-turns. For an 8-foot door, 32 quarter-turns. These are starting points, not guaranteed final settings. You’ll need to test and adjust.
After winding, tighten the set screws on the winding cone while keeping a winding bar inserted for safety. Then stretch the spring by tapping the winding bar lightly toward the center bracket. This seats the coils and improves spring longevity. Add two additional quarter-turns after stretching.
If you want to go deeper on tension settings and what affects them, reading up on garage door spring repair is genuinely useful at this stage. Too little tension and the door won’t stay open. Too much and it will shoot open aggressively, damaging the opener and creating a safety hazard.
Step 6: Test the Door Balance
Remove the locking pliers from the track. Manually lift the door to the halfway-open position and let go. A properly balanced door will stay in place or drift only slightly. If it drops, the spring needs more tension. If it rises, reduce tension by a quarter-turn at a time.
Once balanced, reconnect the opener and run the door through several full cycles. Listen for grinding, jerking, or uneven movement. Any of those symptoms usually point to a cable or drum alignment issue rather than the spring itself.
When DIY Becomes a Liability
Some situations genuinely call for professional help. Here’s a quick breakdown of when to step back:
- High-lift or vertical-lift door systems: The spring configuration is significantly different from standard residential setups and requires specialized tools.
- Doors heavier than 300 pounds: Most consumer-grade replacement springs are not reliably rated for these loads.
- Full system replacement: If you’re not just swapping a spring but setting up a complete new system, a proper garage door installation done by a trained technician ensures the spring, cable, drum, and opener are calibrated together, not in isolation.
- Mismatched components: This is one of the leading causes of premature spring failure, and it’s easy to get wrong when you’re sourcing parts individually.
Torsion springs are the better long-term choice for most homes because of how evenly they distribute load across the door. Extension springs are simpler and less expensive, but they wear faster and carry more projectile risk if the safety cable isn’t properly installed.
Key Takeaways
- Always identify your spring type (torsion vs. extension) before purchasing a replacement. The installation process is completely different for each.
- Winding bars are non-negotiable. Using improvised substitutes is the single biggest cause of spring installation injuries.
- Match the replacement spring to your door’s exact weight and height specifications, not just what looks similar.
- Test door balance at the halfway point before reconnecting the opener. This takes 30 seconds and tells you everything about whether the tension is set correctly.
- If the door has a high-lift configuration, unusually heavy panels, or a commercial setup, have a professional handle the spring replacement.
FAQ
How long does a garage door spring typically last? Most residential torsion springs are rated for around 10,000 cycles. Given that the average household opens and closes their garage door roughly 1,500 times per year, that works out to approximately 6 to 9 years. Higher-cycle springs (rated 20,000 to 30,000 cycles) are available and worth considering if you want fewer replacements over time.
Can I replace just one spring if only one breaks? Technically yes, but it’s usually not advisable. Springs on the same door age at the same rate. If one has broken, the other is likely close to failure. Replacing both at the same time saves you labor and prevents a second breakdown within a few months.
What’s the difference between a left-wound and right-wound torsion spring? The winding direction determines which side of the shaft the spring mounts on and which way tension is applied. Right-wound springs (red cone marking) go on the left side of the door from the inside. Left-wound springs (black cone) go on the right. Installing the wrong orientation will prevent the door from lifting correctly.
Is it safe to operate my garage door with a broken spring? No. A garage door with a broken torsion spring places the full weight of the door on the opener motor, which it isn’t designed to handle. This can burn out the motor quickly and creates a real risk of the door dropping unexpectedly. Keep the door closed and stationary until the spring is replaced. If you’re not comfortable doing the replacement yourself, garage door repair by a qualified technician is a straightforward and affordable alternative.
How do I know what size replacement spring I need? Measure the wire diameter, inside diameter, and length of the existing spring. You can also weigh the door (with the springs disconnected) to cross-check against spring ratings. Most spring manufacturers provide sizing charts based on door weight and height. When in doubt, consult a professional to avoid getting the spec wrong.
When to Call a Professional
If anything about the process above felt unclear, or if you encounter a setup that doesn’t match what’s described here, stopping and calling a technician is the right move. Spring tension mistakes have real consequences, and there’s no shame in recognizing when a job goes beyond what a reasonable DIY project should involve.
To get expert advice or schedule a repair, get in touch with A Plus Garage Doors and speak with a technician who can assess your specific door setup and give you an honest recommendation.